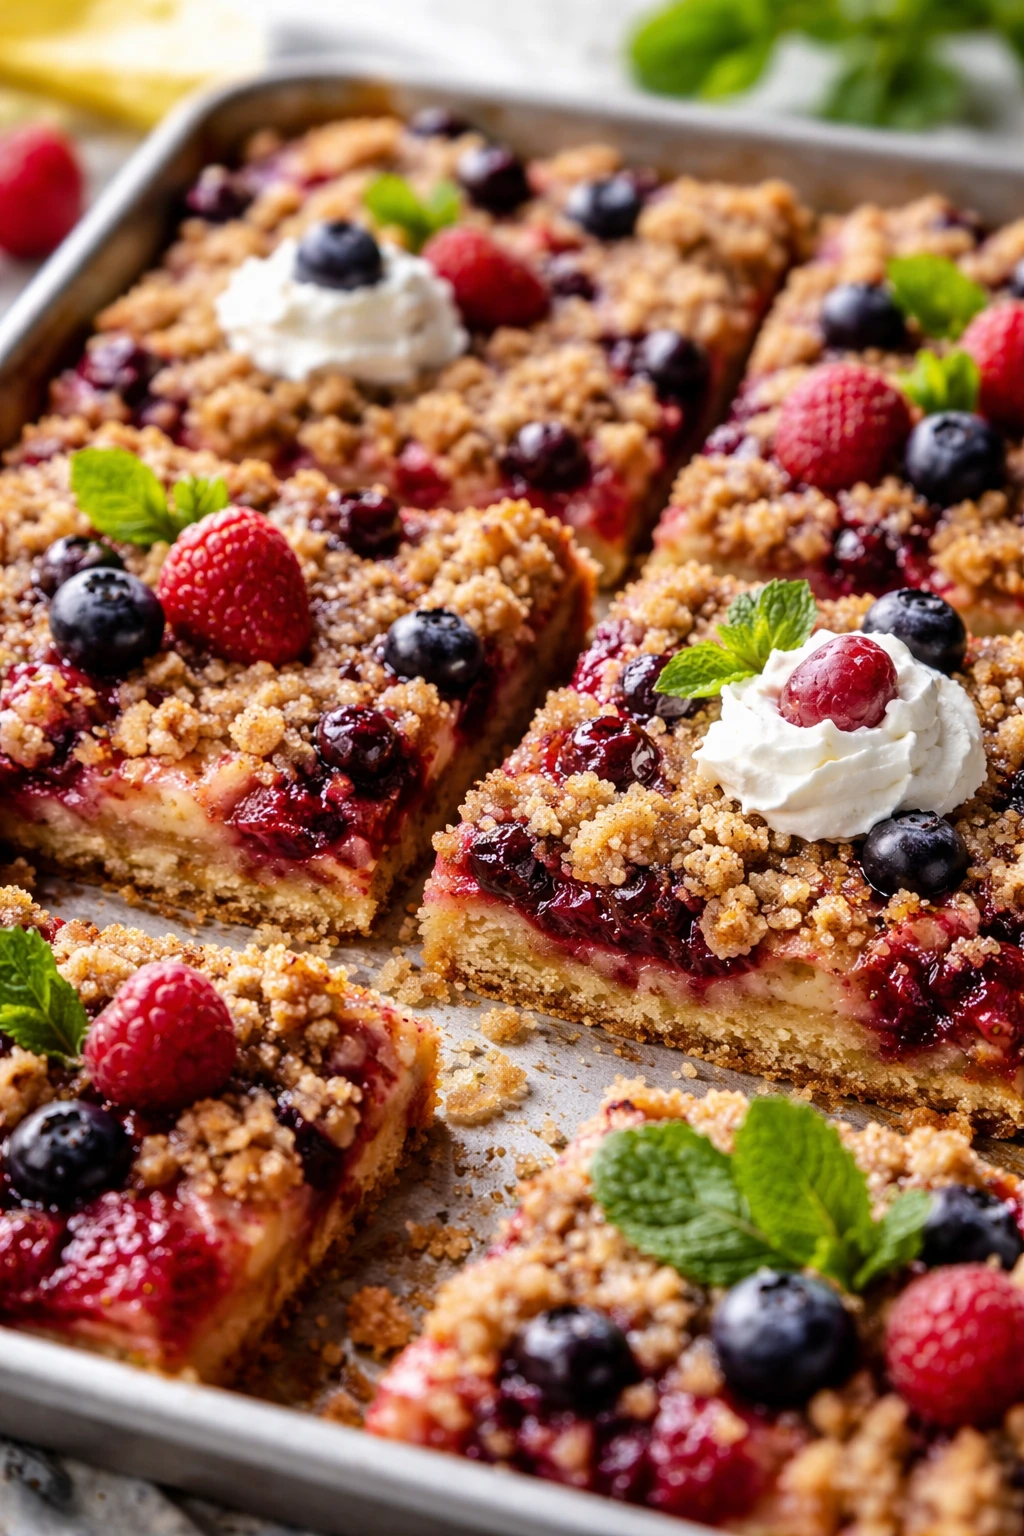
This berry cobbler is a breeze to whip up and always a hit. Juicy berries meet a tender biscuit topping baked right on a sheet pan—less mess, more yum. Serve it warm for cozy nights or casual get-togethers.
Introduction
I first made this sheet pan berry cobbler on a lazy weekend when I wanted something sweet but didn’t want to fuss with multiple bowls or complicated steps. What I love most about this recipe is how it uses just one pan — which means less cleanup and more time to enjoy the cozy, fruity goodness. Unlike traditional cobblers that can be a bit dense or dry, this one has a light, biscuit-like topping that’s tender and slightly crispy on the edges. The berries get bubbly and juicy as they bake, soaking into the topping just enough to make every bite pop with flavor. I discovered that by tossing the berries with cornstarch and lemon juice, it thickens the filling perfectly without turning it mushy. Over the years, I’ve made this recipe countless times, sometimes swapping berries or adding a sprinkle of cinnamon, and it’s always a crowd-pleaser. Expect a warm, inviting dessert with a golden crust, bursting with fresh berry sweetness and a hint of vanilla. It’s perfect for casual dinners, potlucks, or just when you want a little homemade comfort without the fuss.
How To Do It
Step 1
Preheat your oven to 375°F (190°C). Start by preparing the berry filling: in a large bowl, combine the mixed berries, 1/2 cup sugar, lemon juice, and cornstarch. Toss gently until the berries are evenly coated. This step is crucial because the cornstarch helps thicken the juices released during baking, preventing a soggy cobbler. Make sure to coat the berries well but avoid smashing them, as you want the fruit to stay mostly intact.
⏱ Time: 10 minutes
✓ Doneness: Berries evenly coated with no dry spots, mixture slightly thickened
Step 2
Spread the berry mixture evenly across a greased sheet pan. This even layer ensures the filling cooks uniformly and the biscuit topping will bake right on top, soaking up some of the berry juices for extra flavor. Avoid overcrowding the pan to allow air circulation and even browning.
⏱ Time: 5 minutes
✓ Doneness: Berry layer spread evenly with no gaps or mounded piles
Step 3
In a separate bowl, whisk together the flour, 2 tablespoons sugar, baking powder, and salt. These dry ingredients form the base for the biscuit topping. Baking powder is key here—it helps make the topping rise and stay fluffy rather than dense. Mixing the dry ingredients well distributes the leavening evenly, which is important for consistent texture.
⏱ Time: 5 minutes
✓ Doneness: Dry ingredients fully combined with no lumps
Step 4
Cut in the cold, cubed butter using a pastry cutter or your fingers until the mixture resembles coarse crumbs with some pea-sized pieces. The cold butter creates pockets of steam as it bakes, which makes the biscuit topping flaky and tender. Don’t overwork the butter or it will melt, leading to a denser texture instead of light and flaky.
⏱ Time: 7 minutes
✓ Doneness: Mixture looks crumbly with visible small butter pieces
Step 5
Stir in the milk and vanilla extract just until the dough comes together. The batter should be slightly sticky but manageable. Overmixing here can develop gluten and make the topping tough, so mix gently and stop as soon as the dough forms. This moisture level ensures the topping bakes to a soft, biscuit-like texture that contrasts nicely with the juicy berries.
⏱ Time: 5 minutes
✓ Doneness: Dough holds together but is not overly wet or dry
Step 6
Drop spoonfuls of the biscuit dough evenly over the berry layer, leaving small gaps so the berries can bubble up around the edges. This uneven, rustic look is part of the charm and allows the topping to bake through thoroughly while soaking in the berry juices. Don’t try to spread the dough flat — it should be dolloped on top.
⏱ Time: 5 minutes
✓ Doneness: Dough dollops spaced evenly with berry filling visible in between
Step 7
Bake the cobbler in the preheated oven for 30-35 minutes, or until the topping is golden brown and the berry filling is bubbling around the edges. The bubbling is a good sign the filling is thickening and the sugars are caramelizing, adding depth to the flavor. Avoid opening the oven too often to maintain steady heat for even baking.
⏱ Time: 30-35 minutes
✓ Doneness: Golden biscuit topping with bubbling berry filling visible
Step 8
Remove the cobbler from the oven and let it cool for at least 10 minutes before serving. This resting time allows the filling to set slightly, making it easier to serve without running. The aroma will be irresistible, and the topping will still be warm and tender.
⏱ Time: 10 minutes
✓ Doneness: Filling thickened, cobbler slightly cooled but warm
Step 9
Serve warm with a scoop of vanilla ice cream or a dollop of whipped cream if you like. The cold creaminess pairs beautifully with the warm, juicy cobbler, creating a perfect balance of textures and temperatures. Enjoy immediately for the best experience.
⏱ Time: Immediate
✓ Doneness: Ice cream softly melting over warm cobbler
Pro Tips
Use a mix of fresh and frozen berries for year-round flavor.
Frozen berries tend to release more juice as they thaw, which can make the filling runnier. Mixing in fresh berries helps maintain texture and prevents the cobbler from becoming too watery, balancing flavor and consistency.
Keep your butter cold until the last moment.
Cold butter creates flaky layers in the biscuit topping by melting slowly and producing steam. If the butter softens too much or melts before baking, the topping can turn dense and greasy instead of tender and light.
Don’t overmix the biscuit dough once you add milk.
Overmixing develops gluten in the flour, which can make the topping tough and chewy. Mixing just until combined keeps the texture soft and biscuit-like, which contrasts beautifully with the juicy berries.
Let the cobbler rest before serving.
Allowing the cobbler to cool for 10-15 minutes helps the filling thicken and set, making it easier to serve without running. It also lets the flavors meld, enhancing the overall taste and texture.
Use a rimmed sheet pan to catch bubbling juices.
As the berries bake, their juices bubble up and can overflow. A rimmed pan prevents spills in your oven and keeps the juices contained, allowing them to caramelize and add flavor without mess.
Add a sprinkle of coarse sugar on the biscuit topping before baking.
This adds a subtle crunch and a hint of sparkle to the finished cobbler, enhancing texture and visual appeal without overpowering the natural flavors.
Serve with vanilla ice cream or whipped cream for contrast.
The cold, creamy addition balances the warm, tart berries and buttery biscuit, creating a classic flavor combination that elevates the dessert experience.
Common Mistakes to Avoid
Skipping the cornstarch in the berry filling.
Why it happens Some might think the berries will thicken naturally or want to avoid extra ingredients, but the liquid released can make the cobbler soggy.
Fix Always toss berries with cornstarch and lemon juice to thicken the filling. This prevents a watery base and helps the topping bake properly, keeping the texture balanced.
Using warm butter in the biscuit dough.
Why it happens Butter can soften quickly at room temperature, and some skip chilling to save time, unaware it affects texture.
Fix Keep butter cold and cut it into the flour quickly. You can even chill the dough before baking if needed. This ensures a flaky, tender topping instead of a dense crust.
Overmixing the biscuit dough after adding milk.
Why it happens Eager to combine ingredients, some mix too vigorously, developing gluten unintentionally.
Fix Mix just until the dough holds together. A few lumps are okay. This keeps the topping soft and tender rather than tough and chewy.
Spreading biscuit dough flat over the berries.
Why it happens Some try to smooth the topping for a neat look, but this prevents proper baking and texture contrast.
Fix Drop spoonfuls of dough on the berries without smoothing. This rustic placement allows the topping to bake evenly and soak up berry juices.
Baking at too low or too high temperature.
Why it happens Incorrect oven settings can happen if you guess or don’t preheat properly.
Fix Preheat oven to 375°F (190°C) and bake until topping is golden and filling bubbles. This temperature balances browning and cooking through without drying.
Variations
Peach and Blueberry Cobbler
Swap mixed berries for fresh peaches and blueberries for a sweeter, summery twist. Peaches add juicy softness, while blueberries provide a pop of color and tartness. This combo is perfect for late summer gatherings or when you want a slightly different fruit flavor.
Note: Adjust cornstarch slightly if peaches are extra juicy; you may need a bit more to thicken the filling properly.
Gluten-Free Biscuit Topping
Use a gluten-free all-purpose flour blend instead of regular flour for the biscuit topping. This adaptation keeps the cobbler accessible for gluten-sensitive eaters while maintaining a tender, flaky texture with the right blend.
Note: Make sure your gluten-free flour includes xanthan gum or another binder for structure; otherwise, add 1/4 teaspoon xanthan gum.
Add a Cinnamon-Spiced Twist
Mix 1 teaspoon cinnamon and a pinch of nutmeg into the biscuit topping dry ingredients. This adds warmth and spice that pairs beautifully with the berries, creating a cozy flavor profile perfect for fall or winter desserts.
Note: Be careful not to add too much spice, as it can overpower the berries’ freshness.
Vegan Berry Cobbler
Replace butter with coconut oil and use a plant-based milk like almond or oat milk. This makes the cobbler vegan-friendly while keeping the biscuit topping tender and flavorful. Coconut oil adds a subtle tropical note that complements the berries.
Note: Chill the coconut oil solid before cutting it into the flour to mimic cold butter’s effect.
Add a Crunchy Streusel Topping
Top the biscuit dollops with a simple streusel made from brown sugar, flour, and cold butter before baking. This adds a sweet, crunchy texture contrast to the soft biscuit and juicy berries, making each bite more interesting.
Note: Don’t add too much streusel or it can overwhelm the topping; just a light sprinkle works best.
Nutrition
Per Serving:
Nutritional values are estimates and may vary based on specific ingredients used.
Storage & Tips
Room Temperature
Store any leftover cobbler covered loosely at room temperature for up to 2 hours. Beyond this, the fruit filling may start to ferment or spoil. Cover with foil or a kitchen towel to prevent drying out.
Refrigerator
Transfer leftovers to an airtight container and refrigerate for up to 4 days. The cobbler’s texture may firm up and the topping soften, so reheat gently to restore warmth and softness before serving.
Freezer
Freeze the cobbler in a freezer-safe container for up to 2 months. Wrap tightly with plastic wrap and foil to prevent freezer burn. Thaw overnight in the fridge before reheating.
Reheating
Reheat cobbler slices in a 350°F oven for 10-15 minutes until warmed through. Add a splash of milk or water if the topping seems dry. Avoid microwaving as it can make the biscuit topping soggy.
Make Ahead
Prepare the berry filling and biscuit dough separately up to 1 day ahead. Store filling refrigerated and dough wrapped tightly. Assemble and bake on serving day for freshest texture and best rise.
FAQ
Can I use frozen berries instead of fresh?
Absolutely! Frozen berries work well and make this recipe doable year-round. Just thaw them first and drain any excess liquid to avoid a watery cobbler. Toss them gently with cornstarch and lemon juice as usual to help thicken the filling during baking.
What if I don’t have cornstarch?
You can substitute with an equal amount of all-purpose flour, but the filling may be less glossy and slightly thicker. Cornstarch is preferred because it produces a clearer, silkier sauce. If you use flour, mix it well with the sugar before tossing with berries to avoid lumps.
How do I know when the cobbler is done baking?
Look for a golden-brown biscuit topping and bubbling fruit filling around the edges. The bubbling signals the juices have thickened and the cobbler is cooked through. The topping should feel set and slightly crisp on top.
Can I make this cobbler gluten-free?
Yes! Use a gluten-free all-purpose flour blend that contains xanthan gum for the biscuit topping. This substitution keeps the texture tender and flaky. Avoid using just almond or coconut flour alone, as they behave differently and can change the structure.
How do I store leftovers?
Cool leftovers completely, then store in an airtight container in the fridge for up to 4 days. Reheat in the oven to restore warmth and texture. Avoid leaving the cobbler at room temperature for extended periods to prevent spoilage.
Can I add other fruits besides berries?
Definitely! Peaches, apples, or cherries work well. Just adjust the cornstarch slightly if the fruit is very juicy. Mixing fruits adds interesting flavor layers and texture contrasts.
Why is my biscuit topping dense instead of flaky?
This usually happens if the butter was too warm or the dough was overmixed. Keep butter cold and mix just until combined to create flaky layers. Overworking develops gluten, making the topping tougher.
Can I prepare this cobbler ahead of time?
Yes, you can prepare the berry filling and biscuit dough separately a day ahead and refrigerate. Assemble and bake just before serving for the best rise and fresh texture.
Final Thoughts
I hope you enjoy making and sharing this easy sheet pan berry cobbler as much as my family does! Don’t forget to let me know how it turns out or any fun twists you try.