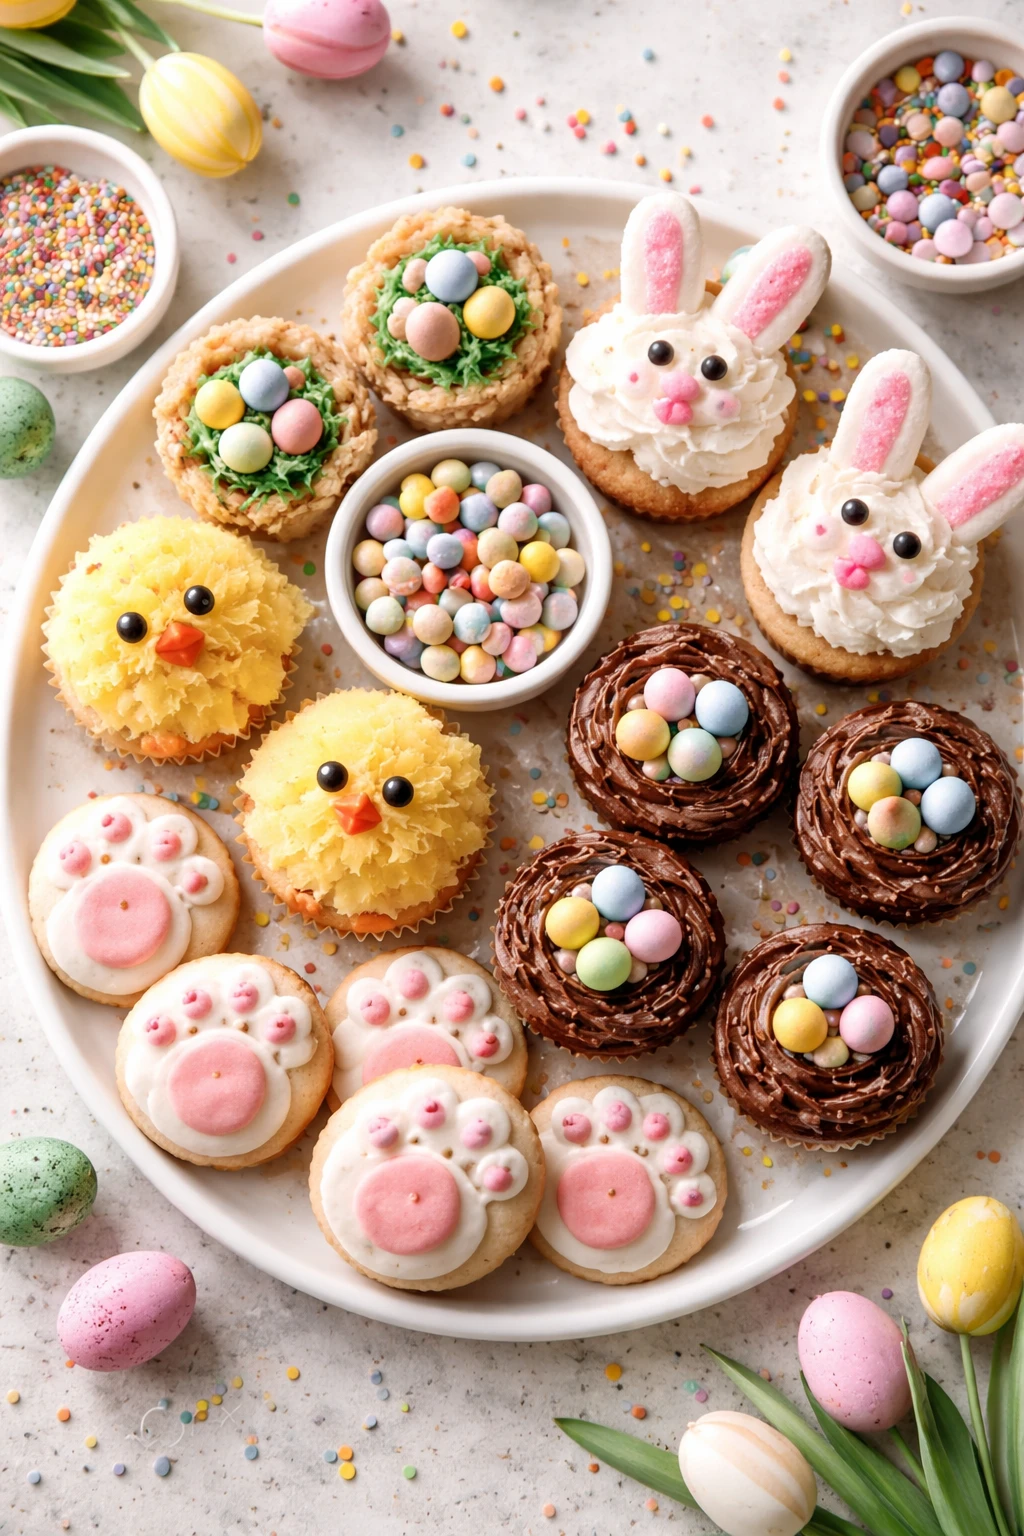
These Easter Bunny Cupcakes are a delightful treat that's super easy to make and perfect for little helpers. Bright, colorful, and topped with cute bunny faces, they’re ideal for spring parties or family fun days.
Introduction
I first made these Easter Bunny Cupcakes a few years ago when my niece wanted to help bake something special for her school party. It was a blast seeing her excitedly place marshmallow ears and draw little faces on each cupcake. What makes this recipe stand out is how incredibly easy it is for kids to get involved — no complex piping skills required! Instead of fancy frosting techniques, we use simple buttercream and fun decorations like mini marshmallows and sprinkles to create adorable bunny faces. The trick I learned is to soften the butter really well for a smooth, creamy frosting that spreads easily, even for little hands. These cupcakes come out light, fluffy, and decorated with a sweet, playful charm that’s perfect for spring celebrations or family gatherings. Plus, they’re colorful and festive without any fuss, making them my go-to Easter treat whenever I want something cheerful and quick.
How To Do It
Step 1
Preheat your oven to 350°F (175°C) and line a muffin tin with cupcake liners. Prepare the vanilla cake mix according to the package instructions, making sure to mix thoroughly but not overbeat. Overmixing can make the cupcakes dense instead of light and fluffy. Pour the batter evenly into the liners, filling about two-thirds full to leave room for rising. This step is important because it sets the base for perfectly shaped cupcakes that bake evenly without overflowing.
⏱ Time: 10
✓ Doneness: Cupcakes should be golden on top and spring back lightly when pressed.
Step 2
Bake the cupcakes for 18-20 minutes, testing doneness with a toothpick inserted into the center — it should come out clean or with a few moist crumbs. Avoid opening the oven door too early to prevent sinking. When done, let the cupcakes cool completely in the tin for 5 minutes, then transfer to a wire rack. Cooling fully before frosting is key to prevent melting and sliding frosting.
⏱ Time: 20
✓ Doneness: Toothpick comes out clean, and cupcakes feel springy.
Step 3
While cupcakes cool, prepare the buttercream frosting. Beat softened butter on medium speed until creamy and pale, about 3 minutes. This aerates the butter and creates a light texture. Gradually add powdered sugar, about half a cup at a time, mixing well between additions. Add milk and vanilla extract, then continue beating until smooth and spreadable. If desired, add a few drops of pink food coloring for a blush tint. The right consistency should be thick but easily spreadable without running.
⏱ Time: 10
✓ Doneness: Frosting is smooth, creamy, and holds soft peaks.
Step 4
Spread a generous layer of buttercream on each cooled cupcake using a small offset spatula or butter knife. Don't rush — a smooth, even layer gives a neat base for decorating. If the frosting feels too stiff, add a splash of milk to loosen it. Conversely, add more powdered sugar if too thin. This step ensures the bunny decorations stick well and look tidy.
⏱ Time: 5
✓ Doneness: Frosting covers cupcake evenly with a smooth surface.
Step 5
To create the bunny ears, cut mini white marshmallows in half diagonally to form ear shapes. For a pink inner ear, gently press a tiny piece of pink marshmallow or use pink frosting on one side. Place two marshmallow halves at the top of each cupcake, pressing lightly into the frosting so they stand upright. This simple technique gives the cupcakes their adorable bunny silhouette.
⏱ Time: 5
✓ Doneness: Marshmallow ears are firmly anchored and stand tall.
Step 6
Using an edible black marker or black icing gel, draw two small dots for eyes and a tiny 'V' shape for the nose on each cupcake. Take your time here — these little details bring the bunnies to life! If you don’t have an edible marker, you can pipe tiny dots with black gel icing using a toothpick. Avoid pressing too hard to keep the cupcake surface intact.
⏱ Time: 5
✓ Doneness: Faces look cute and neat with defined eyes and nose.
Step 7
Sprinkle assorted pastel sprinkles gently around the cupcake base to mimic spring flowers or Easter eggs. This adds color and whimsy, enhancing the festive feel. Use a light hand to avoid knocking over the marshmallow ears or smudging the faces. This final touch makes the cupcakes visually joyful and perfect for celebrations.
⏱ Time: 3
✓ Doneness: Sprinkles are evenly scattered without disturbing other decorations.
Step 8
For the finishing touch, chill the cupcakes in the fridge for 10 minutes to set the frosting and decorations firmly. This helps maintain their shape and prevents the marshmallow ears from sliding off during serving or transport. If you’re serving immediately, a quick chill still improves stability.
⏱ Time: 10
✓ Doneness: Frosting feels slightly firm and decorations are secure.
Step 9
Serve your Easter Bunny Cupcakes at room temperature for the best flavor and texture. If refrigerated, allow them to sit out for 15 minutes before serving so the buttercream softens slightly. These cupcakes are delightful to share at spring parties, Easter brunches, or as a cheerful family dessert.
⏱ Time: 0
✓ Doneness: Cupcakes look fresh and inviting with vibrant decorations.
Pro Tips
Let the cupcakes cool completely before frosting.
Frosting warm cupcakes causes the buttercream to melt and slide off, ruining the decoration. Cooling fully ensures the frosting holds its shape and the cupcakes stay neat and appetizing.
Use an offset spatula for frosting.
An offset spatula allows for smooth, even spreading without damaging the cupcake surface. It also helps you control the thickness of the frosting layer, giving a professional look with minimal effort.
Cut marshmallows with sharp kitchen scissors.
Sharp scissors make clean cuts on marshmallows, preventing tearing or squishing. This keeps your bunny ears looking neat and uniform, which is key for cute, consistent decorations.
Chill cupcakes after decorating.
Chilling firms up the buttercream and secures the marshmallow ears, preventing them from sliding or falling off when served or transported.
Use room temperature butter for frosting.
Butter at room temperature whips up light and fluffy. Cold butter won’t incorporate air well, while melted butter results in greasy frosting.
Test cupcake doneness with a toothpick.
Inserting a toothpick ensures the cupcakes are baked through without overbaking, which can dry them out. A clean toothpick means perfect doneness.
Add pastel sprinkles last and lightly.
Sprinkles add festive color but too many or pressing too hard can ruin your decorations. Lightly scattering them preserves the neat bunny design.
Common Mistakes to Avoid
Frosting cupcakes while still warm
Why it happens Often people want to frost cupcakes right after baking, not realizing heat melts the buttercream.
Fix Wait until cupcakes are completely cool before frosting. If in a hurry, place them in the fridge for 15 minutes to speed cooling.
Overmixing cake batter
Why it happens Trying to get batter very smooth can lead to overmixing, activating gluten and toughening cupcakes.
Fix Mix just until ingredients are combined and smooth. Stop as soon as you see no flour streaks.
Using cold butter for frosting
Why it happens Some assume cold butter is better but it doesn’t whip well and results in clumpy frosting.
Fix Soften butter at room temperature until easily indented but not melted.
Placing marshmallow ears too early
Why it happens Putting marshmallows on while frosting is still wet can cause them to slide off.
Fix Apply ears after frosting is spread, then gently press to anchor them. Chill cupcakes to set.
Not testing cupcake doneness
Why it happens Assuming baking time is exact can lead to under or overbaked cupcakes.
Fix Use a toothpick inserted in center; if clean, cupcakes are done.
Variations
Chocolate Bunny Cupcakes
Swap the vanilla cake mix for chocolate for a richer flavor. Use chocolate buttercream frosting and white marshmallows for ears to keep the bunny look. These are perfect for chocolate lovers wanting a festive twist.
Note: Chocolate batter may bake slightly faster; watch closely and test doneness early.
Gluten-Free Easter Bunny Cupcakes
Use a gluten-free vanilla cake mix and ensure all decorations are gluten-free. This makes the cupcakes accessible to those with dietary restrictions without sacrificing fun or flavor.
Note: Gluten-free mixes sometimes require extra moisture; follow package adjustments carefully.
Vegan Bunny Cupcakes
Make vegan cupcakes using plant-based milk and egg replacers. Use vegan butter for frosting and check marshmallows for gelatin-free options. These cupcakes are just as cute and delicious, perfect for vegan celebrations.
Note: Vegan buttercream may be slightly softer; chill well before decorating.
Fruit-Filled Bunny Cupcakes
Add a spoonful of strawberry or raspberry jam in the center of each cupcake before baking for a fruity surprise. Top with vanilla frosting and bunny decorations as usual for a fun twist.
Note: Jam adds moisture; reduce liquid slightly in batter to compensate.
Lemon Zest Bunny Cupcakes
Add fresh lemon zest to the batter and frosting for a bright, citrusy flavor. This variation feels fresh and springy, perfect for Easter brunch or garden parties.
Note: Lemon zest can intensify quickly; use sparingly to avoid bitterness.
Nutrition
Per Serving:
Estimates based on standard ingredients; may vary with substitutions.
Storage & Tips
Room Temperature
Cupcakes can be kept at room temperature for up to 4 hours if covered with a cake dome or airtight container to prevent drying out and contamination.
Refrigerator
Store in an airtight container for up to 3 days. The frosting may firm up and the marshmallow ears soften slightly. Bring to room temperature before serving for best texture.
Freezer
Freeze cupcakes without decorations for up to 2 months. Wrap individually in plastic wrap and place in airtight container. Thaw overnight in the fridge and decorate fresh.
Reheating
No reheating needed. Serve at room temperature. If refrigerated, let sit 15 minutes out of fridge before serving to soften frosting.
Make Ahead
Bake cupcakes 1-2 days ahead and store undecorated in an airtight container at room temperature. Prepare frosting and decorations the day of serving for freshest look and taste.
FAQ
Can I use homemade cake batter instead of a cake mix?
Absolutely! Homemade vanilla cake batter works great and lets you control ingredients. Just make sure your batter isn’t too dense so cupcakes stay light and fluffy. Follow the same baking time but check doneness with a toothpick.
How do I keep marshmallow ears from sliding off?
Make sure cupcakes are fully cooled and frost is spread evenly but thick enough to hold the marshmallows. Gently press ears into frosting and chill cupcakes to set decorations. Avoid placing ears on warm or runny frosting.
Can I make these cupcakes gluten-free?
Yes! Use a gluten-free vanilla cake mix and verify all decorations are gluten-free. Gluten-free batters may need slight adjustments to moisture or baking time, so watch closely while baking.
What if I don't have an edible marker for the faces?
You can use black gel icing applied with a toothpick or a fine piping tip. Just be careful to draw gently to keep cupcakes intact. Alternatively, small chocolate chips or mini candies can be used for eyes and nose.
Can I prepare these cupcakes a day ahead?
Yes, bake and cool cupcakes a day ahead and store in an airtight container. Make the frosting and decorate on the day you plan to serve for the freshest appearance and best texture.
How do I store leftover decorated cupcakes?
Keep leftover cupcakes in an airtight container in the fridge for up to 3 days. Bring them to room temperature before serving so the frosting softens nicely.
Is it okay to use regular marshmallows instead of mini ones?
Regular marshmallows are too large and heavy for bunny ears. Mini marshmallows are the best size and shape for this decoration. If you only have large ones, try cutting them into smaller pieces carefully.
Can I tint the frosting other colors?
Definitely! Pastel colors like pink, lavender, or pale blue work great for Easter. Use gel food coloring sparingly to avoid thinning the frosting.
Final Thoughts
I hope you have as much fun making these bunny cupcakes as I do! They’re a sweet, simple way to celebrate spring — can’t wait to hear how yours turn out!