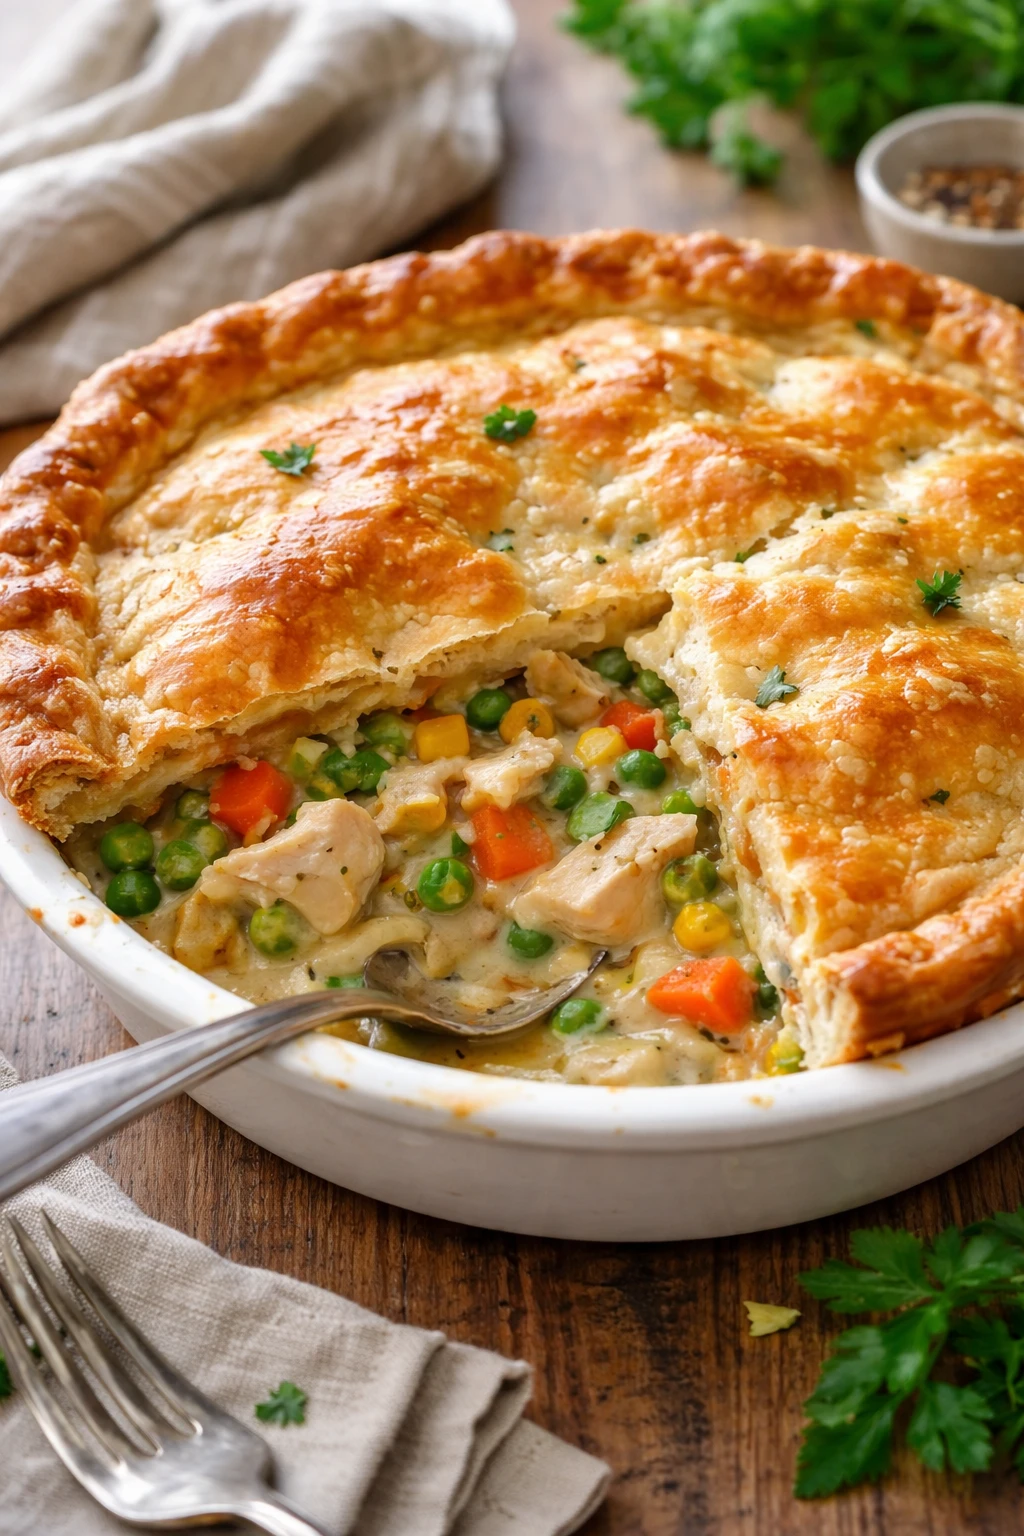
This chicken pot pie is pure comfort in a dish—flaky, buttery crust with a creamy, veggie-packed chicken filling. The homemade crust really takes it to the next level. Great for cozy dinners when you want something warm and satisfying.
Introduction
I first made this chicken pot pie years ago when I was craving something warm and comforting on a cold evening. The classic combination of tender chicken and creamy veggies wrapped in a flaky crust quickly became a family favorite. What makes this version special is the homemade crust — it’s buttery, flaky, and golden brown, which really elevates the whole dish. I used to rely on store-bought crusts, but once I made my own, I noticed such a difference in texture and flavor. The trick I learned is to keep the butter cold and work quickly to get those perfect flaky layers. The filling is rich but balanced with fresh carrots, peas, and celery, making it hearty but not heavy. When it’s done, you’ll get that irresistible aroma and a golden crust that’s just begging to be sliced. It’s the perfect meal for cozy nights in, especially when you want something homemade but not overly complicated. Plus, leftovers reheat beautifully, so it’s great for busy days too. Honestly, this pot pie feels like a warm hug on a plate every single time.
What You'll Need
One 9-inch pie, 6 servings
- 2 cups cooked chicken, shredded
- 1 cup carrots, diced
- 1 cup frozen peas
- 1/2 cup celery, diced
- 1/3 cup unsalted butter
- 1/3 cup all-purpose flour
- 1/2 teaspoon salt
- 1/4 teaspoon black pepper
- 1/4 teaspoon dried thyme
- 1 3/4 cups chicken broth
- 2/3 cup milk
- 2 pie crusts, homemade or store-bought
How To Do It
Step 1
Begin by preparing your vegetables: dice the carrots and celery into small, even pieces to ensure they cook evenly. This step is crucial because uneven pieces can lead to some veggies being undercooked while others are mushy. Using fresh carrots and celery adds a nice crunch and sweetness to the filling. Set them aside for now.
⏱ Time: 10
✓ Doneness: Vegetables are uniformly diced, about 1/2 inch pieces
Step 2
Melt the butter in a large saucepan over medium heat. Once melted, whisk in the flour to create a roux. Stir constantly for about 2 minutes until the mixture turns a light golden color—this cooks out the raw flour taste and helps thicken the filling later. Be careful not to let it brown too much or it will affect the flavor.
⏱ Time: 5
✓ Doneness: Roux is smooth, light golden, and slightly thickened
Step 3
Slowly whisk in the chicken broth and milk to your roux. Pour gradually while whisking to avoid lumps. Bring the mixture to a gentle simmer and cook until it thickens, about 5-7 minutes. This step builds the creamy base of your filling. If it’s too thin, your pie will be runny; if too thick, it can feel gluey, so keep an eye on the consistency.
⏱ Time: 7
✓ Doneness: Filling thickens enough to coat the back of a spoon
Step 4
Add the diced carrots, celery, peas, shredded chicken, salt, pepper, and thyme to the thickened sauce. Stir gently to combine everything. Cook on low heat for another 5 minutes, allowing the flavors to meld and the veggies to soften slightly. Avoid overcooking here to keep some texture in the veggies.
⏱ Time: 5
✓ Doneness: Veggies are tender but still hold shape
Step 5
Preheat your oven to 425°F (220°C). Roll out one pie crust into a 9-inch pie dish, pressing it gently to fit without stretching. Pour the chicken filling into the crust, spreading it evenly. This step is key to getting an even bake and a sturdy base for the filling.
⏱ Time: 10
✓ Doneness: Pie crust fits snugly with no tears or bubbles
Step 6
Roll out the second pie crust and place it over the filling. Trim any excess dough and pinch the edges to seal the pie. Cut a few small slits in the top crust to allow steam to escape during baking. This prevents a soggy crust and helps the filling cook evenly.
⏱ Time: 10
✓ Doneness: Crust is sealed tightly with steam vents cut
Step 7
Brush the top crust with a beaten egg or milk wash for a golden, glossy finish. This simple step gives your pie that bakery-quality look and adds a subtle richness to the crust’s flavor.
⏱ Time: 5
✓ Doneness: Top crust has an even, glossy coating
Step 8
Bake the pie in the preheated oven for 30-35 minutes. Watch for the crust to turn a deep golden brown and for the filling to bubble through the vents. Baking thoroughly ensures the crust is crisp and the filling is piping hot throughout.
⏱ Time: 35
✓ Doneness: Crust is golden brown and filling bubbles visibly
Step 9
Remove the pie from the oven and let it rest for at least 10 minutes before slicing. This resting time allows the filling to set, making it easier to cut neat slices without the filling spilling out.
⏱ Time: 10
✓ Doneness: Filling is set and pie slices cleanly
Pro Tips
Keep your butter and water ice cold when making the crust.
Cold butter creates steam pockets during baking, which puff up the dough layers and produce a flaky crust. If the butter melts before baking, the dough will be dense and tough. Using ice water helps maintain the dough’s temperature, so work quickly and chill the dough if needed.
Don’t skip the step of cooking the roux before adding liquids.
Cooking the butter and flour mixture removes the raw flour taste and helps the starch granules swell properly. This ensures a smooth, thickened sauce that clings to the chicken and veggies. Rushing this step results in a pasty flavor and lumpy filling.
Cut small slits in the top crust to vent steam.
The filling releases hot steam as it cooks. Without vents, steam builds up under the crust, causing sogginess or even cracking. The slits allow moisture to escape, keeping the crust crisp and helping the filling cook evenly.
Use fresh or thawed frozen vegetables for best texture.
Fresh veggies hold their shape and add a slight crunch, balancing the creamy filling. Frozen veggies can release excess water when cooked, making the filling watery. If using frozen, thaw and drain them well before adding to the filling.
Let the pie rest before slicing.
Resting allows the filling to thicken and set, making it easier to cut clean slices. Cutting too soon leads to a runny filling spilling out, which can be messy and disappointing.
Brush the crust with egg wash for a golden finish.
Egg wash adds shine and a richer color to the baked crust, making it look more appetizing. It also creates a slight crispness on the surface, enhancing texture and flavor.
Use shredded chicken instead of chunks for even filling.
Shredded chicken distributes more evenly throughout the filling, giving a balanced bite in every slice. Large chunks can make some bites overly meaty and others mostly sauce or veggies.
Common Mistakes to Avoid
Overworking the pie dough
Why it happens Many people think kneading the dough more makes it better, but overworking develops too much gluten, making the crust tough instead of flaky.
Fix Handle the dough as little as possible. Mix ingredients just until combined, chill well before rolling, and avoid stretching the dough when fitting it into the pie dish.
Skipping the roux cooking step
Why it happens Rushing to add liquids can seem like saving time, but uncooked flour tastes raw and gritty.
Fix Cook the butter and flour mixture for a couple of minutes until it’s lightly golden and fragrant before adding broth and milk.
Not venting the crust
Why it happens Some overlook the steam vents and end up with soggy or cracked crusts.
Fix Always cut small slits in the top crust to release steam during baking.
Using watery frozen vegetables without draining
Why it happens Frozen veggies release water when cooked, diluting the filling.
Fix Thaw frozen vegetables fully and pat dry before adding to the filling.
Cutting the pie too soon
Why it happens Impatience leads to slicing into hot filling that hasn’t set, making a mess.
Fix Let the pie cool and rest for at least 10 minutes before serving.
Variations
Turkey Pot Pie
Swap out the chicken for leftover turkey to make a delicious holiday-inspired pot pie. The flavors are richer and it’s a great way to use up turkey leftovers. The texture is similar, but the taste is a bit more robust and perfect for colder months.
Note: Use the same cooking method, but reduce salt slightly if your turkey is already seasoned.
Vegetarian Pot Pie
Replace chicken with hearty mushrooms, potatoes, and additional veggies like corn or green beans. Use vegetable broth instead of chicken broth. This version is just as comforting and packed with flavor, perfect for meat-free nights.
Note: Sauté mushrooms well to develop umami; adjust thickening time as veggie moisture varies.
Cheesy Chicken Pot Pie
Add a cup of shredded cheddar or gruyere cheese to the filling for a creamy, cheesy twist. It melts into the sauce, making the filling extra rich and indulgent. Great for cheese lovers wanting a little extra comfort.
Note: Add cheese after thickening sauce but before adding chicken and veggies to ensure even melting.
Gluten-Free Pot Pie
Use a gluten-free flour blend for the crust and a cornstarch slurry to thicken the filling. This adaptation keeps the pie tender and flavorful without gluten, perfect for those with sensitivities.
Note: Be mindful of crust handling as gluten-free dough is more fragile and needs gentle rolling.
Spicy Chicken Pot Pie
Add a pinch of cayenne pepper or chopped jalapeños to the filling for a subtle kick. This variation adds warmth and depth, making it perfect if you like your comfort food with a little heat.
Note: Adjust spice levels carefully so it complements but doesn’t overpower the creamy filling.
Nutrition
Per Serving:
Nutritional values are estimates and may vary based on specific ingredients used.
Storage & Tips
Room Temperature
Chicken pot pie can safely sit out covered at room temperature for up to 2 hours. Beyond that, bacteria can grow, so it’s best to refrigerate promptly after serving. Cover with foil or plastic wrap to keep dust and debris away.
Refrigerator
Store leftover pie in an airtight container or wrapped tightly with plastic wrap in the fridge for up to 3-4 days. The crust may soften slightly, but reheating in the oven helps restore crispness. Avoid microwaving if possible to keep texture intact.
Freezer
Freeze the pie wrapped tightly in plastic wrap and aluminum foil for up to 2 months. To prevent freezer burn, ensure no air pockets remain. Thaw overnight in the fridge before reheating. Reheat in a preheated oven at 350°F until warmed through, about 20-30 minutes.
Reheating
Reheat pot pie in a 350°F oven for 20-30 minutes until the filling is hot and the crust is crisp. If reheating from frozen, allow extra time and cover the edges with foil to prevent burning. Avoid microwaving, which can make the crust soggy and the filling unevenly heated.
Make Ahead
You can prepare the filling 1-2 days ahead and store it in the fridge. Assemble the pie just before baking to keep the crust fresh. Alternatively, assemble fully and freeze before baking; bake directly from frozen, adding extra baking time.
FAQ
Can I use store-bought pie crust instead of homemade?
Absolutely! Store-bought crusts save time and still yield delicious results. Just make sure to thaw them properly before rolling and follow the same venting and egg wash steps to get a nice golden crust.
How do I prevent a soggy bottom crust?
To avoid sogginess, make sure your filling isn’t too watery by cooking it until thickened before filling the pie. Also, pre-baking the bottom crust for a few minutes (blind baking) can help create a barrier that keeps it crisp.
Can I make this pot pie dairy-free?
Yes! Substitute the butter with a dairy-free alternative and use coconut or almond milk instead of regular milk. Use a dairy-free crust if needed. The flavor will change slightly but it will still be creamy and comforting.
What’s the best way to reheat leftovers?
Reheat in a 350°F oven for 20-30 minutes to keep the crust flaky and the filling hot. Microwaving can make the crust soggy, so it’s best avoided unless you’re in a hurry.
Can I add other vegetables to the filling?
Definitely! Feel free to add mushrooms, green beans, or corn. Just adjust cooking times so veggies are tender but not mushy. Adding more veggies boosts flavor and nutrition.
How long does the filling need to cook before baking?
Cook the filling until it thickens and the veggies are just tender, about 10-15 minutes total. This ensures a creamy but not watery filling that bakes well inside the crust.
Is leftover cooked chicken okay to use?
Yes! Leftover chicken works perfectly and saves time. Just shred it finely and add it toward the end of making the filling to keep it moist.
What if my crust cracks when rolling it out?
Let the dough rest in the fridge for at least 30 minutes if it cracks—it relaxes the gluten. Also, roll gently and patch any cracks with a little water and extra dough before baking.
Final Thoughts
Give this chicken pot pie a try and let me know how it turns out! It’s a cozy, satisfying meal that really hits the spot.